
Mysore Dosa batter | Learn how to make crispy, brown, flavourful dosas
Learn how to make perfectly crispy, evenly browned, delicious and flavourful dosa. This recipe of Mysore dosa covers detailed description to help you make the dosas right.
Ingredients
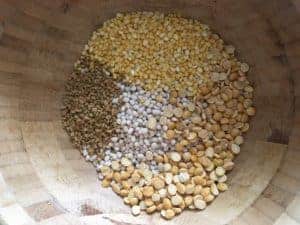
- 1.5 cups raw rice - , sona masuri rice
- 0.5 cup idli rice/dosa rice/parboiled rice - (refer notes)
- 0.5 cup urad dal - , whole gota or split
- 3-4 tablespoons flattened rice - (poha/avalakki)
- 1.25 tablespoons toor dal
- 1.25 tablespoons chana dal
- 1.25 tablespoon moong dal
- 1.5 teaspoons fenugreek seeds (methi)
- 1 tsp sugar - (optional)
- salt - to taste
Measurement: 1 cup = 250ml
Instructions
Making the dosa batter
- In a bowl, measure and add in all the lentils/dal along with fenugreek seeds. Wash them all well thrice or four times. Soak in clean water (1-2 inches above the level of the lentils) for 5-6 hours.
- In another bowl, measure and add in sona masuri rice and idli rice together. Wash well thrice or four times. Soak in clean water (1-2 inches above the level of the lentils) for 5-6 hours.

- Just before grinding the previously soaked ingredients, wash and soak flattened rice for 10 minutes.
- After 6 hours, discard the water from both of these bowls. Next, grind the contents in the urad dal bowl first, adding fresh water as required until they are completely smooth, fluffy and light. Do not add a lot of water in one go, add in steps as required. Once ground well, transfer this to a container. Note: My grinder required about 2 cups water to grind these. Mixer will require less.
- Next, adding just enough fresh water, grind raw rice, idli rice/dosa rice and the flattened rice (poha) together until they are ground smooth. Remember the rice should not be coarse as it will not be enjoyable while eating dosa. Likewise, do not grind for too long as it will heat up the batter. Note: I used about 3/4-1 cup water here.
- Transfer this to the same container in which you have poured the ground urad dal. With your clean hand or a ladle, mix everything very well. Using your hand helps to bring in the good bacteria needed for fermentation.
- Once it is mixed well, just close with a lid leaving a little gap for the air to go in. Let this ferment for 6 to 12 hours or more, depending on the room temperature.
Making the dosa
- After the batter is well fermented, add salt to taste, 1 tsp sugar and mix everything well.
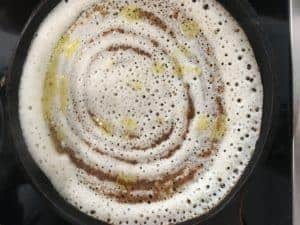
- Heat a tawa and pour 1 to 2 ladles of dosa batter on to the tawa depending on the size of the tawa and how thick or thin you want your dosa to be. Note: Please check the tips above this recipe card to follow some important steps before pouring the batter.
- Spread quickly in a circular motion to form concentric rings. Cover with a lid, add some ghee or oil and cook this for about 3-4 minutes until you see the dosa is browned on one side. Remember: If the batter if fermented well, you will see pores throughout the dosa.
- Flip the dosa and cook for about a minute to make sure the other side is also cooked. However, if you are sure the dosa is cooked well, you can skip flipping. Note: Do not cook the other side for too long as it will make the dosa extremely crispy.
- If you want to spread red chutney, spread it almost after the dosa has been cooked. If you want to flip your dosa, do it and then spread the red chutney and add in the potato masala.
Notes
- You can use only raw rice (sona masuri) and skip using idli rice / dosa rice / parboiled rice if you do not have. Idli rice/dosa rice makes the dosa softer and spongier.
- During extreme winter, you can add salt before fermentation as it will help in fermenting.
- Kindly do not skip adding any of the ingredients if you want the exact results.
- Patience is the key- let your dosa cook well in medium heat until it is uniformly brown, if not only the centre part will be brown.
- Also, make sure the tawa is heated just right-neither too hot nor cold.
- The very first dosa might not get uniformly brown, as the tawa takes time to get heated uniformly. From the second dosas it will just be fine
- You can make thin or thick, crispy or soft dosa. These dosas will just fit everyone's palate.
- If you want to pack it for lunch, make slightly thick dosas and do not let them turn too much crispy. Otherwise, they will become a bit hard.
- Adding ghee while cooking gives a really nice glossy look on the dosas, and ghee is much better than refined oil in health aspects.
Tried this recipe?Mention @the_culinary_peace or tag #theculinarypeace!